January 8 - Snowstorm
Same look different instructions
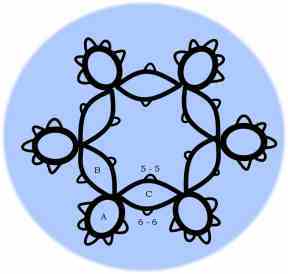
There should be joins at the center picot of two of the adjacent rings that have 5 picots. These are the rings between the snowflakes. The drawing program wasn't behaving when I did this diagram. I have photos of a similar snowflake in progress on my blog: http://rozellalinden.blogspot.com The only difference is that one has another snowflake in the center.
Snowstorm Instructions:
RingA (2 - 1 - 1 - 1 - 1 - 2)
RingB (6 - 6 - 5 - 5)
* Split ringC (5 - 5 / 6 - 6)
RingA (2 - 1 - 1 - 1 - 1 - 2) *
Repeat between * around, join to ringB before tatting the final RingA.
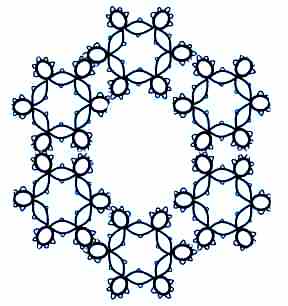
If you tat the last ringA as a split ring you can begin another flake by tatting another ringA as a split ring (1 - 1 - 2 / 1 - 1 - 2), then continue to repeat the rest of the snowflake pattern joining to the previous flake. These can be joined together endlessly.
Notes:
The number of stitches can be changed to alter the size of this piece, but the proportions will remain the same. This could be tatted as individual snowflakes using the instructions from yesterday, but you would need to do a LOT of [ CTH - Cut Tie & Hide ] of the ends. Tatting split rings, you can keep on tatting. This is THE best reason to learn split ring tatting!!!
Five Different ways to learn Split Ring Tatting Online:
(in alphabetical order)
http://www.bellaonline.com/articles/art5501.asp Shuttle Tatting Split Ring
http://www.georgiaseitz.com/classes/splitring.html Shuttle Tatting Split Ring
http://www.hhtatting.com/splitring.htm Needle Tatting Split Ring
http://www.paradisetreasures.com/altsrhr.html Shuttle Tatting Split Ring
http://www.picotnet.com/TatOnline/spring_instruction.htm Shuttle Tatting Split Ring
posted by Ruth @ 7:24 AM
![]()

<< Home